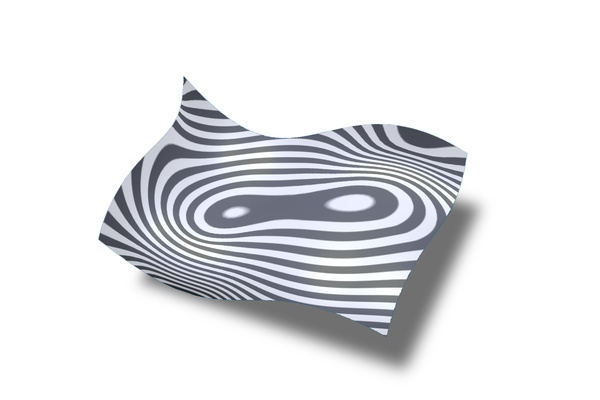
Mastering Class A Surfaces in CAD
Creating high-quality surfaces in CAD is essential for industries where aesthetics, precision, and functionality meet—think automotive, aerospace, and consumer goods. When it comes to surface modeling, Class A surfaces stand as the gold standard for designers. In this post, we’ll explore what Class A surfaces are, why they matter, and how to master them to elevate your design skills and boost your portfolio.

What Are Class A Surfaces?
Class A surfaces are smooth, high-quality surfaces in CAD modeling with curvature continuity and a high degree of polish, often crafted using advanced surfacing techniques. These surfaces are typically used for visible, exterior parts of a product, where seamlessness and visual quality are paramount. Unlike basic surfaces, Class A surfaces achieve a precise curvature without noticeable transitions, making them appear smooth and flawless from every angle.
Characteristics of Class A Surfaces
- High-quality surface finish: Perfectly smooth and visually appealing.
- Curvature continuity (G2 or G3): Achieved by maintaining a continuous flow between adjoining surfaces.
- Seamless transitions: No visible breaks or abrupt changes in the surface.
- Aesthetic precision: Essential for customer-facing parts in high-end industries.
Importance of Class A Surfaces in Design
Creating Class A surfaces is critical in industries where a product’s look and feel impact brand value and user perception. In the automotive industry, for example, exterior surfaces are meticulously crafted to ensure vehicles are visually appealing and aerodynamic. In aerospace, it contributes to performance and fuel efficiency, while consumer goods benefit from designs that are both attractive and functional.
High-quality surfaces can also make the difference in improving product durability, reducing aerodynamic drag, and increasing market appeal. Class A surfaces demonstrate to clients and employers that you’re proficient in advanced CAD modeling techniques, making you more competitive in design and engineering roles.
Key Techniques for Creating Class A Surfaces in CAD
To create Class A surfaces, you need a solid grasp of specialized tools and techniques. Here are some strategies to master:
1. Use Surface Continuity (G0, G1, G2, G3)
In CAD modeling, surface continuity is a measure of smoothness. Class A surfaces usually require G2 or G3 continuity, ensuring that surfaces not only align but also follow a fluid curve without sharp transitions.2. Practice Filleting and Blending
Seamless blending is critical for Class A surfaces, especially where curves meet. Filleting techniques—like rolling ball, curvature, and chamfered fillets—help smooth these transitions. The aim is to maintain visual flow so that no edges appear jagged or misaligned.3. Utilize Advanced CAD Tools for Surface Modeling
Most CAD software offers advanced tools specifically for surface modeling. They usually provide specialized surfacing modules to achieve Class A finishes. Familiarizing yourself with tools like Loft, Sweep, Boundary Surface, and Fillet can significantly improve your surface quality.4. Apply Zebra Stripes Analysis
Zebra stripes are essential tools for inspecting the curvature of a surface. This feature, available in most CAD software, projects simulated reflections on surfaces, highlighting any irregularities. If the stripes flow smoothly across edges, you’re likely on track to achieving Class A standards.5. Regularly Use Curvature Comb Analysis
Curvature combs graphically represent how a surface’s curvature changes across its length. With this tool, you can identify sharp changes or inconsistencies, giving you a precise indication of where adjustments are needed for a smoother finish.6. Optimize Control Points for Smoothness
Fine-tuning control points (or “edit points”) along a curve or surface is one of the best ways to maintain surface continuity. Fewer control points generally produce smoother curves, as each point adds complexity to the curvature. A clean, optimized layout of control points will yield better visual appeal and structural integrity.Benefits of Mastering Class A Surfacing
Mastering Class A surfacing opens doors in several high-end industries where premium quality is non-negotiable. Here’s why investing time to learn Class A surfacing pays off:
- Competitive Advantage: Class A expertise is a valued skill in automotive, aerospace, and product design.
- Enhanced Portfolio: Showcasing Class A surfaces can make your portfolio stand out, demonstrating your ability to create sophisticated, consumer-facing designs.
- Increased Value: Companies value Class A modelers who can ensure their products look and perform at their best.
- Career Versatility: Knowledge of Class A surfacing expands job prospects and gives you flexibility in working on various design projects.
Conclusion
Class A surfacing in CAD modeling is a skill that separates novice designers from advanced professionals. From perfecting the art of curvature continuity to mastering specialized tools, Class A surfaces require practice and dedication. Whether you’re designing the sleek lines of a car or the exterior of a consumer product, knowing how to create flawless Class A surfaces is invaluable.
Investing in these skills not only enhances your design portfolio but also opens doors to some of the most exciting and high-paying roles in the design industry. Start honing your Class A surfacing techniques today and watch your design work shine in any project or product.